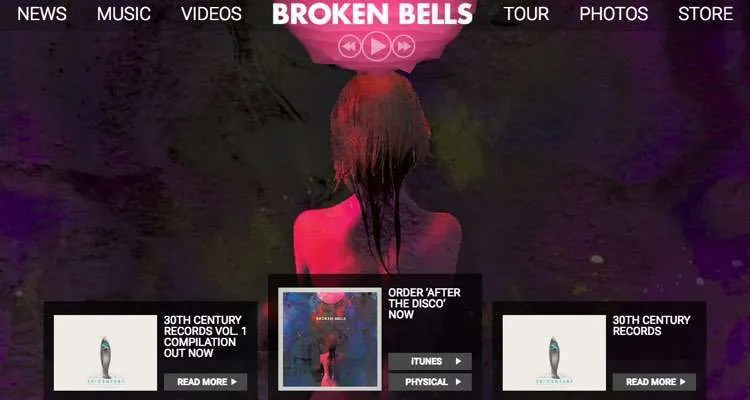
If you want to know how to make a website, you’ve come to the right place. This guide covers everything, from design to domains, to hosting to WordPress, not to mention the critical creative and strategic thinking required to make a winning site.
Before we jump in on how to make a website that completely rocks, DMN would like to give a huge shout to HostGator, who made this review possible. If you want great, affordable hosting for your webpage, plus a bunch of other great services and support, you owe it to yourself as an artist to put HostGator on the shortlist.
Now, onto the tutorial!

We’ll divide this tutorial on how to make a website into a few major sections.
Part I: The Many Advantages of Building Your Own Website
Part II. Building the Eco-System: Your Site + Twitter, Facebook, SoundCloud, Youtube, Spotify, Bandcamp, iTunes…
Part III. Visualizing Your Website Aesthetic
Part IV. The Pre-Game: Practical Before-You-Build Considerations.
Part V. Laying the Initial Foundation
Part VI. Setting Up WordPress
Part VII. Build Plan: Deciding Your Iterations
Part VIII. Designing a Highly-Functional, Beautiful Site With WordPress Templates
Part IX. Mobile (Responsive) Sites
Part X. Prepare to Launch!
Part XI. Setting Up Email
Part XII. What’s Bandcamp?

How to Make a Website
Part I: The Many Advantages of Building Your Own Website
It’s really confusing to be a musician these days, especially when it comes to your online presence. How should you focus your limited energy and time to create a website that truly matches your artistic personality and connects with your fans?
Should you even spend the time on a website at all?
There are definitely artists skipping the traditional artist website, though that can be a risky move. The most successful and well-managed artists are typically available across a broad number of platforms, but they also focus a lot of time and energy on their own website environments. The reason for this is simple: a band has complete control over their dedicated webpage, unlike Facebook, SoundCloud, Twitter, Instagram, or YouTube. All of those mega-platforms have huge audiences and can propel an artist career, but in the end, they set the rules, not you.
That’s not a problem, until it’s suddenly a problem. Unfortunately, artists typically don’t realize there’s an issue until they’re completely up that proverbial creek. That’s the point at which your massive host platform decides to completely change the rules, typically without any warning. And it usually happens after hundreds of hours of effort building up a profile and fanbase, sometimes far more.
Sometimes, the changes are more annoying than catastrophic. Other times, you can be forced to change your entire marketing strategy, overnight. Which sucks if you’re (a) on the road, (b) in the studio, or (c) trying to focus your creative energies into songwriting or other areas critical to your career. You simply may not have the time or resources to deal with the endless changes and tweaks, even if it’s siphoning off your audience.
We’ve seen various disaster scenarios play out dozens of times, and in some cases, we’ve actually seen entire companies get buried overnight by a simple change in strategy (yeah, it involved Facebook a few years ago). But just this year alone, artists have weathered a number of huge changes from massive social networking and music platforms. All of these have impacted artists unexpectedly, and in a completely serious way.
Here are just a few examples:
1. After battling record labels for years, SoundCloud has repeatedly ripped down entire artist pages without warning. This has happened to huge DJs and developing artists alike, all of whom have witnessed their massive followings go poof in a matter of hours. Sometimes these teardowns are for serious violations by the artist, but most of the time, they are the result of some label dispute or policy change that had little or nothing to do with the artist at all.
2. Facebook upended its entire algorithm for updating followers by shifting the emphasis towards interpersonal updates. In other words, friends started taking far greater precedence over bands, which meant that artists had even less ability to control the messages received by fans. That’s a growing trend, and has deeply impacted artists, many of whom have spent years building up their Facebook followers.
3. YouTube just notified thousands of channels that their content was suddenly ‘advertiser unfriendly,’ leading to an all-out panic among thousands upon thousands of creators. YouTube later said that their policies hadn’t changed, though the message was clear: YouTube, not the creator, was deciding the rules here.
And in the end, YouTube is determining what gets advertising support, prioritization, or other attention (including search results). They can even terminate your account, by accident, for a claim put against you.
4. Twitter continues to hang in the financial balance, with executive turmoil raising longer-term issues about the survival of this platform. Will Twitter even be around in a few years?
…and so on!
The point is this: no one is changing the rules on how your fans can interact with you on your own website.
If you want to sell them tickets right up front, you can do that. If you want to lead them into a fun game, then you can do that. If you want to set up a forum, fan club, e-commerce, or some other fun variation, you can not only do that, but you can set the rules and parameters around those activities.

Pro tip! By the way, that goes for email too, which we’ll discuss in more detail later on. It’s a sandbox that’s fully under your control. It’s also a direct-to-fan relationship in which your followers have total control over how you communicate with them, and there are lots of tools that will let you accomplish that.
But even beyond these sudden changes are the inevitable shifts that happen across all social media and music hubs. Teens started ditching Facebook years ago, and podcasting has recently started taking a chunk out of SoundCloud. And anyone that remembers MySpace knows how quickly the social media sands can shift. To paraphrase the old cliche, if there’s anything that’s constant, it’s change. And that is doubly true when it comes to social media and music platforms.
But… ignore social media and music sites at your own risk.
All of that said, ignore social networking and sites like SoundCloud at your own risk! Remember, some of your biggest fans may never visit your site once. They may only check you out on Facebook or follow you on Snapchat, then grab a ticket from the venue (or at the door).
So the best approach is to effectively reach everyone, on every platform, while trying to lure them to your core website platform. Which leads us to our next section.

How to Make a Website
Part II. Building the Eco-System: Your Site + Twitter, Facebook, SoundCloud, Youtube, Spotify, Bandcamp, iTunes…
One clever way to approach your website is to put it at the center of a big constellation of different platforms, including social networking, download, and streaming hubs. That means effectively spreading a lot of the same updates, information, and music around, with some customized information created for specific platforms. You can even focus a lot of your energies on one platform, like Snapchat for example, after you’ve laid the foundation for your website.
1. How to strategically pick your focus platforms.
“Every battle is won, before it’s ever fought.”
Sun Tzu.
Before building this interconnected web of all things your music, it’s important to deeply strategize and reflect on your audience. Learning how to make a website is a fantastic step to connect with fans, but it will never reach 100% of them.
For starters, it’s helpful to think about where your fans are likely to be, or, which platforms will allow you to connect most effectively with them. Shawn Mendes, for example, rose to fame using Vine, correctly calculating that younger fans (like himself) would love his updates on a fresh, new platform. Plus, it was just a fun place to experiment and upload videos, which is another reason things worked out for him.
And other brilliant examples of this abound, for example:
• DJ Khaled, now almost synonymous with blanketed Snapchats, used that platform to create a wall of updates before other artists figured it out. These days, a lot of people think Snapchat helped to throw Khaled’s career into overdrive (though they may be unsubscribing after a little over-exposure).
• OK Go, sensing a massive surge in YouTube popularity, put the video first and scored a massive hit.
• DJs, recognizing the instant connection offered by streaming to hyper-connected younger fans, started investing lots of time on their SoundCloud profiles. That includes artists like Kygo and Post Malone, who used SoundCloud to break through.
• Amanda Palmer, a pioneer in direct-to-fan funding and DIY artistry, tapped Twitter and Kickstarter to raise over $1.2 million for new release and tour.
…and so on.
The point is, all of those platforms can be used to great advantage, with your site adding value by collecting emails, selling merchandise, updating tour dates, or acting as a fansite hub. Everything should work seamlessly together.
b. Syndication
But how can you possibly keep up to ten different social networking platforms and music sites up to date, all the time? That’s actually impossible without the help of syndication partners, which help you spread the same information across multiple platforms.
On the update side, check out Hootsuite (hootsuite.com), for example, to help you post once and populate many times. Twitterfeed (twitterfeed.com) is another one (yeah, the name is a little misleading but Twitterfeed actually hits a bunch of different platforms at the same time, including Facebook).
On the music side, upload once and distribute widely with services like ReverbNation, CD Baby, Tunecore, or Symphonic Distribution, who will distribute your music to Spotify, Apple Music, SoundCloud, Deezer, and iTunes, among many other endpoints (all of which you can link to from your artist website).
Even podcasting has lots of helpers, including Stitcher (stitcher.com), though that’s another piece entirely. Anyway, if you need more help on setting up your network of platforms, let us know in comments or just email DMN at news@digitalmusicnews.com.
But, with all of these endpoints, your website forms the perfect hub for posting tour dates, blogs, pictures, and anything else important. And, throughout, you control the posting, cataloging, and prioritization of these things, while feeding out bits constantly to different sites and platforms.
So the best approach to figuring out how to make a website is to always think of the broader web of connection points.
c. The ‘Hub-and-Spoke’ Website Building Model.
And remember, you website functions as a perfect hub in all of this. On your site, you control the presentation, frequency and organization of everything you post, while spreading it out to other platforms that have their own rules.
It’s a perfect hub-and-spoke strategy, and typically, your official sites pops to the top of Google Search when fans are trying to find you. In the end, it’s great to learn how to make a website. But it’s far better to learn how to make a website that exists at the core of a broader ecosystem of social networks and platforms.
Here’s a really simplified idea of how this hub-and-spoke strategy can work:
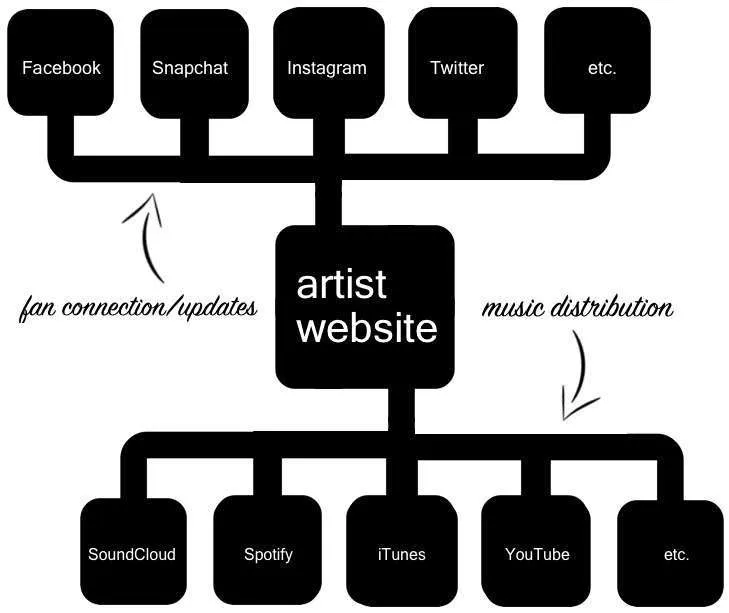
How to Make a Website: The Hub-and-Spoke Strategy
The confusing part here is that all of these endpoints are different, and usually blur social networking with multimedia. Take Instagram as an example: on one level, Instagram is just an image-intensive update platform, but it’s also a great way to distribute videos. In fact, it’s typical for a fan to upload a live clip from one of your shows onto Instagram (without you even realizing it). You may also decide that Instagram makes sense for quick video updates alongside your image updates. But those same clips would make little sense for Spotify (but might be perfect for your YouTube channel).
The point is, you (and your team) are constantly making nuanced decisions about how to distribute your material. And oftentimes, you won’t release it on your own website, because it doesn’t quite fit in (or, a fan uploaded it, or some other reason). Your albums might be streamable on Spotify, but wouldn’t live on your site.
In other situations, your website is the only place where fans can get something. You might sell vinyl directly on your site, and update your network every time you create something new for sale. Or, update your tour dates on your site first, then alert your networks of the coming tour.
Your site can serve as your hub in many situations, and where your core fans will become accustomed to finding out what’s going on. In the end, it’s not about how to make a website, but how to make a website that stands as a hub for a myriad of different contact points.
But what’s this hub going to look like? Let’s dive into the real focus of this piece…

How to Make a Website
Part III. Visualizing Your Website Aesthetic
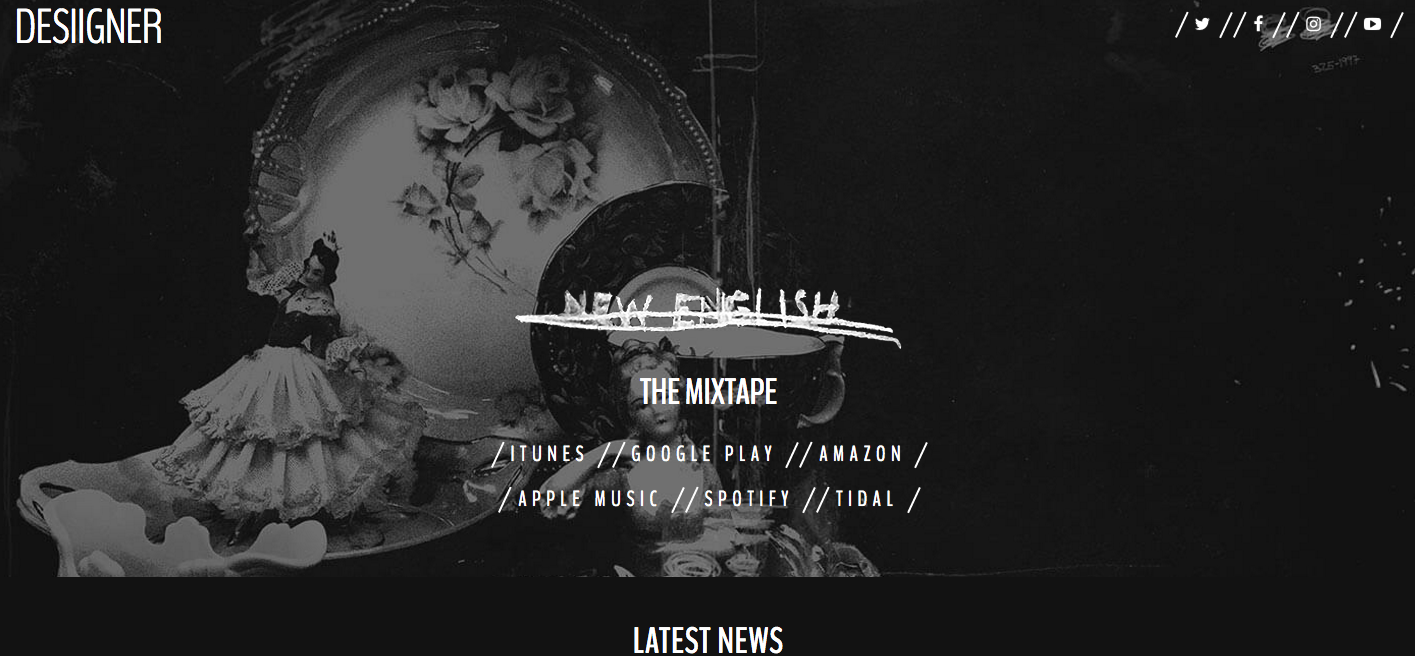
How to Make a Website: Official website for rapper Desiigner (notice the hub-and-spoke strategy).
Before you start, overhaul, or redesign your website, think about what statement you want to create, and what you want to focus on. Here are some questions to consider:
• Your band and your music stand for something. How can your site match that?
• If your audience generally fits a certain ‘demographic,’ like age range, gender, or lifestyle, how can you match those sensibilities?
• If you have broader appeal, what unifies all of your followers (hope, frustration, escapism, rage, religion)? How can you website convey and reinforce that?
• If you are part of a scene, big or small, what do the sites of bands in your scene look like?
• Are most of your fans mobile? Then think about mobile first, desktop second.
• Is your audience ironic and retro? More involved or less involved? Tech-focused or longing to go off-grid? Minimalist or collectors?
• What do you want your fans to feel when they see your site?
Maybe this is the perfect time to grab a smoke, sip a coffee (or three), and bounce around the big ideas on how to make a website that truly takes your fan connections to the next level. After throwing a bunch of ideas out there, you should have a feel for whether you want something minimalist, high-energy, image-intensive, highly-interactive, community-focused, or all of the above. Try to jot down some general points and ideas at this stage, because once you’re in the details and putting out fires, it can be difficult to reflect on the bigger vision.
None of this has to be firmly laid out, but everyone involved in the project should have a common creative vision for the site aesthetic and approach before beginning. One way to ensure a common vision is to etch out some bigger ideas of what you want this site to achieve. Or, values, messages, or ideas you want to adhere to throughout the construction of your site.

Pro tip! Keep in mind that if you’re a solo, unsigned artist, you typically get to make all the decisions, and skip all the disagreements and (sometimes) the fighting. The only downside is that you’re also responsible for making the entire vision come to light, not to mention learning how to make a website on your own.

How to Make a Website
Part IV. The Pre-Game: Practical Before-You-Build Considerations.
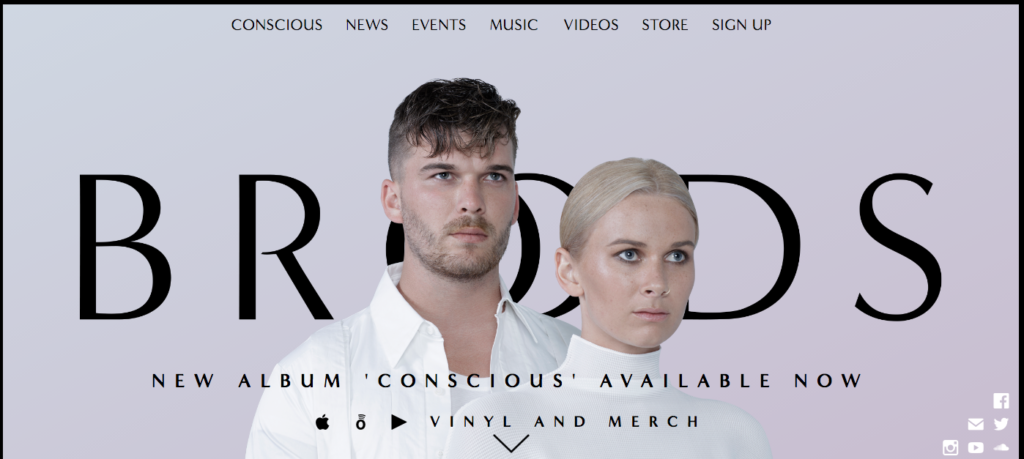
How to Make a Website: Official site for Broods, at broodsmusic.com (notice the prioritization of revenue-generating vinyl and merch).
Once that big thinking is out of the way, it’s time to focus on some more nuts-and-bolts considerations. Because even the most adventurous architectural statement still requires a solid foundation and structure. In fact, the more outrageous and bold your site, the more important the fundamentals will be. Learning how to make a website is fun, but save the sexier stuff for later.
a. Prioritizing aspects: visual, e-commerce, information, community, streaming.
Stepping back from the aesthetics, an artist website should also be structured around revenue. That means that if you are primarily a touring band, and 90% of your income comes from shows, your site should probably feature tour dates, an easy ticketing option, and lots of live clips and goodies.

Pro tip! Making music is a joy, but making money while playing music is nirvana. So, focus on the fans that are paying you the most, and prioritize the things that make you the most money. Concert tickets, merchandise, and vinyl are usually high on the list. The real trick is learning how to make a website that solidly prioritizes those things.
Merchandise, a major revenue-generator at shows itself, may also be a core focus for your site. You could even give your fans the option to order extra merchandise before, during, or after the show, skipping lines and picking whatever customization they want.
There are also a lot of online+offline aspects to consider as well. Mention your website address from the stage, splash it on your backdrop display, or experiment with bundling merchandise with ticket purchases. Maybe you get a free t-shirt if you buy two tickets, and an additional item of your choice every extra ticket.
Or, a bundled premium ticket+merch+beer package… you get the idea. See what works, all powered by your site (if you can control the ticketing).
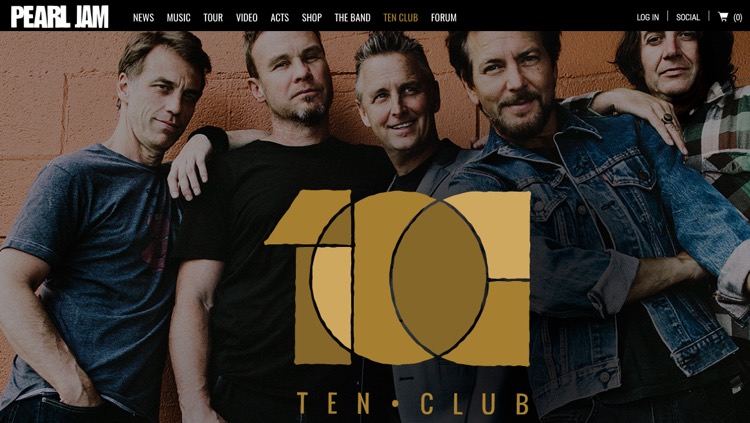
How to Make a Website: Pearl Jam’s Ten Club
Other bands are at the center of scenes, which makes the website a perfect forum and hub for that community. Fallout Boy actually had a lot of success with that approach, while Pearl Jam smartly uses their site as a hub for their ‘Ten Club’ fan club.
There are plenty of other variations, including a focus on better revenue-generators like vinyl, private performances, and limited-edition album releases as we mentioned above.
But perhaps it’s worth expanding upon some more. Walk into any supermarket, and every item is strategically placed to generate the most money. Flowers up front, impulse magazines and packs of gum at the end. You have a lot of different ‘items’ for sale as well, so why not drive your fans to the areas that generate the most revenue for your art?
Why not learn how to make a website that pays you back?
b. ‘Flowing’ your fans from streaming to site.
We’ve talked about putting your site at the center of an ecosystem of different platforms. Now, it’s time to focus on shuttling your fans from lower-paying platforms to higher-paying ones. For example, streaming platforms like YouTube, SoundCloud, Spotify, and Apple Music can be great for generating awareness for artists, but are typically bad at generating serious revenues.
With that in mind, it makes sense to attempt to drive your fans from lower revenue-generating areas like YouTube and SoundCloud back to your website. Now that they’re excited about your music, get them into a sandbox that pays a lot more, with better-generating purchases like concert tickets, merchandise, vinyl, and even fan-funded projects.
Then, the trick is to keep those fans there with connectors like email sign-ups and fan community. Suddenly, you’re figuring out how to make a website that can help to build an entirely different revenue profile for you. Ultimately, it’s all about learning how to make a website that optimizes engagement and revenues!
c. Who will oversee this pre-, post-launch?
Also import to consider is who will be guiding, leading, and maintaining the website. Is this the same person that constructed the site, or will updates be relegated to another person? Without those decisions determined, sites can either remain in construction indefinitely, or simply rot from lack of maintenance.
And, if your Facebook page is getting updated while your site lays in ruins, you’re definitely missing out on some major opportunities to connect, monetize, and build your fanbase.
d. Basic site-mapping and wireframing.
At this stage, you might want to start mapping out how you want this site to look from a structural standpoint. This will make all the difference, and dramatically shrink the time required to go live.
Perhaps you want to keep your site simple initially, then start layering different aspects later. That approach makes a lot of sense, as it allows you to push versions in an ‘iterative’ fashion, without letting endless details and complexities delay your launch. Websites should be constantly growing and evolving, and your first version can actually be pushed out fairly quickly. That’s how to make a website that is dynamic, growing, and full of (great) surprises.
Here’s a really simple site map, just to give you an idea of how things can be organized.
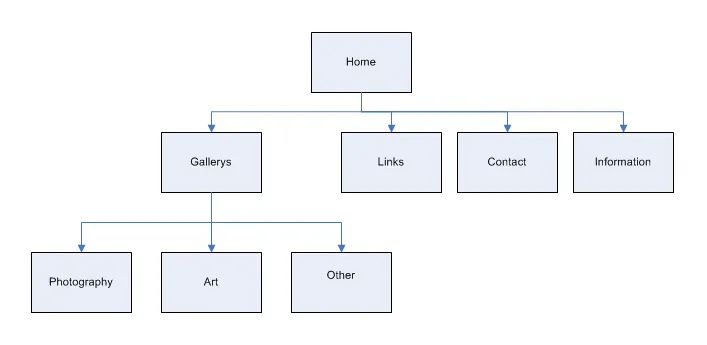
How to Make a Website: A simple sitemap (Image supplied by Andrew, CC by 2.0)
So, just a map to help visualize what you’re creating. You may want something with only a few different destinations, or something far more complex. Either way, start diagramming it and construction will be a far easier chore.
At this stage, just keep it pretty general, as you’ll be refining it in later stages. And, it will be really helpful to think about some other artist websites that you really like. Perhaps you’re inspired by the simple organization of one, or the scrolling, highly-visual approach of another. When it comes to basic layouts, pick and choose what you like.
It’s all pretty much been done before, especially at the more basic building levels.
e. Multimedia considerations.
At this early planning stage, it will be really helpful to think about what sort of multimedia you want to incorporate into your site. Multimedia basically refers to things like embedded audio and video, and can also include more sophisticated concepts like musical stems and higher-end audio downloads.
So how do you make a website that easily incorporates print, audio, video, and everything in between?
Most bands and artists include a modest amount of embeddable audio and video into their sites, with partners like SoundCloud and Vimeo easy to incorporate. The rest, make ‘em buy it! But, knowing what you’re going to incorporate will be helpful as you start to move through the build steps.

Warning! Don’t surprise your visitors by immediately playing music when your site loads. That’s a totally 90s move, and will look amateurish. For starters, most visitors will already be listening to something else, but they may also find themselves suddenly blasting your latest track to their entire office. Surprise your fans some other way!

How to Make a Website
Part V. Laying the Initial Foundation
Now that you’ve etched the basic vision and outline together, let’s shift your brain towards some of the fundamental building blocks. These are absolutely critical for any site, though they’re not too complicated in the end.
a. Securing a domain name.
This is a critical first step for your website, both for desktop, mobile, or any other access point. Simply stated, your domain name, or URL (or ‘universal resource locator’), is your web address and what you will use for the lifetime of your site.

Pro tip! Looking ahead, a big part of your fanbase will be accessing your site through mobile. That still requires a domain name, but it will be the same one. And you can actually create a pretty cool app off your site, accessed through your domain name. More on that later…
First Step: Picking your domain.
Ideally, you’ll want a name like yourbandname.com or yourname.com, but that may not always be available. In fact, given how ‘old’ the internet is these days, there’s a good chance the name you want is already taken (though, another pro tip is to simply reserve yourbandnameofficial.com, which is an effective trick used by a lot of artists).
How can you check to see if the url you want is taken? Lots of different services can check for you, and reserve an available domain. For example, check out whois.net, Network Solutions, or tucowsdomains.com. All of these can look up the domain name (or domain names) you want, and cross-check to see what extensions (like .net, .me, or .ly are available).
Once you find the domain name you want, just purchase it!
What if your band name isn’t available?
If your domain name isn’t available, you basically have a few options. You can try to purchase the url you want, which can be expensive, or simply choose another url. Or, wait around in the hopes that the domain name will eventually be abandoned.
Let’s look at the first option. Sometimes, if your name is reserved but not being actively used, you can purchase it at a reasonable rate. But, before approaching the person that owns your url, check to see when that url expires. If it’s up in a month, for example, the previous owner may simply let it lapse. That’s not usually the case, but on more specialized url names, it happens. Perhaps that person used to have the same band name as yours, but has since moved onto something else.
Finding the owner of a reserved domain.
If you want to purchase the url from someone else, you’ll need to look up who owns the url in question.
But, consider your next steps carefully: if you approach that person directly, you could get overcharged, since the person now knows you want this url because it matches the name of your band. Direct negotiations like these can cost you thousands of dollars, though sometimes they are unavoidable.
Consider your TLDs.
If you can’t afford a direct purchase, there are a bunch of other options at your disposal. There are now all sorts of different endings, or TLDs (short for ‘top level domains’). What effectively started with .com and .net has now expanded into a myriad of other options, like .me, .ly, .biz, .co, or .li, for example. Looking ahead, more extensions will also be added, making it easier to land a domain name that works.
The reality is that most people won’t mind if you have an extension that isn’t a .com. Sure, a .com is preferable, but it’s not critical. Most of the time, your fans will be coming from Google anyway, or entering the site from a sign at a show. The key is that it’s easy to remember, and luckily, people are almost always online these days and don’t need to remember the url for long.
![]() Found another band with the exact same name as yours? Then you should probably read this legal guide on how to best proceed.
Found another band with the exact same name as yours? Then you should probably read this legal guide on how to best proceed.
So, pick something and go, even if it’s temporary. You can survive with myband.me for now, and negotiate for myband.com later. If you have a strong fanbase, you can easily switch people over, or, you may decide it doesn’t really matter in the end.
And last bit on domain names: it doesn’t matter where you reserve it. Just make sure the registrar is legit, or, if you’ve already reserved a name, figure out where you registered it. Both require just a little bit of research. From there, you can just transfer your nameservers to match your hosting provider when you’re ready to go live (which will make a lot more sense later in this tutorial).
b. Hosting
Your domain name is the address where people can find you. But what happens once they arrive?
Hosting refers to where your website lives, and from where it is served. That means everything from the code for your pages to your database, as well as images, music, and other aspects like backups.
Your site will live on a server, or a series of servers that work together to create a cohesive, easy-to-use website for your fans. The more complicated your site becomes, the more involved your hosting package will be.
Hosting is one of those things you really want to get right, because if your hosting isn’t solid, you’ll be dealing with crashes, downtime and lost data. A fan can’t look at tour dates if your site is down, and neither can they buy a t-shirt. So learn how to make a website that rocks, and also has rock solid hosting.
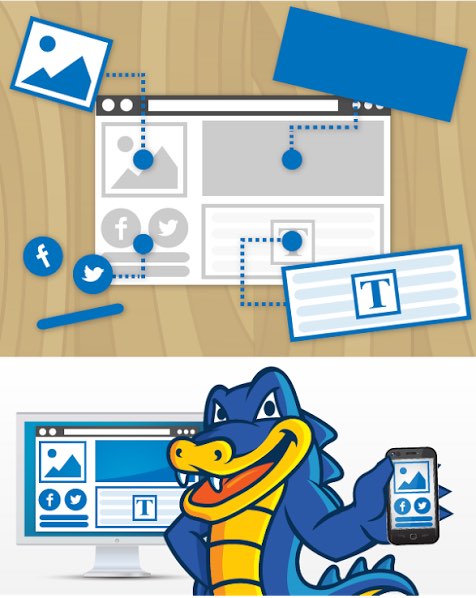
How to Make a Website: HostGator, a hosting company focused on simple, building block construction, with extensibility across multiple screens. We recommend these guys!
At this stage of the game, there are lots of pretty solid solutions out there, for not that much money. And if you need something really quick-and-dirty, you can do it within a day. One great place to start is HostGator, who sponsored this guide. These guys specialize in things like band websites, and offer some pretty affordable rates (that’s actually one of their competitive advantages). As you can see, their entire philosophy is geared towards simplicity, with a building block approach we’d recommend. They’re one of the companies that really fit into our philosophy on how to make a website that effectively builds your career.
Actually, one other thing on HostGator: they also offer domain name registration services along with a bundle of other services, so HostGator is a solid place to start and what we’ll use in this example. (If you want to try them out, use this link, and DMN2016 to get 25% off any order).
That said, there are lots of other solutions out there for hosting, depending on what you need. A few great names that also come to mind are Squarespace, bluehost, GoDaddy, and Dreamhost, among others. PC Magazine actually does a pretty solid review of about 10 different ones, here.
c. Seriously Simple, or Seriously Involved?
At this juncture, you should make a quick choice about what you need to build. That includes right now (ie, launching in a day or this week), and what you want to have longer term. For example, if you really just want a three-page site with some pics and basic information, then you shouldn’t pay for anything complicated.
If you’re aiming for anything with any level of complexity or fan interactivity, you probably need a more complicated backend. But, as you’ll see, most of those complexities are easy to use, with backends that can quickly handle aspects like photos, multimedia, forums, or regularly updated information like tour dates.
If you’re a superstar act with hundreds of thousands or millions of followers, you probably need something higher-end and, well, BIG. You’d be surprised that even extremely big artists can be serviced by more standardized packages these days. But give us a shout if you need some advice navigating those next steps.

Pro tip! One thing that’s important to keep in mind at this stage is that it’s typically easy to upgrade to a bigger package. Downgrading can be a little more complicated, especially if you sign up for a longer-term plan.
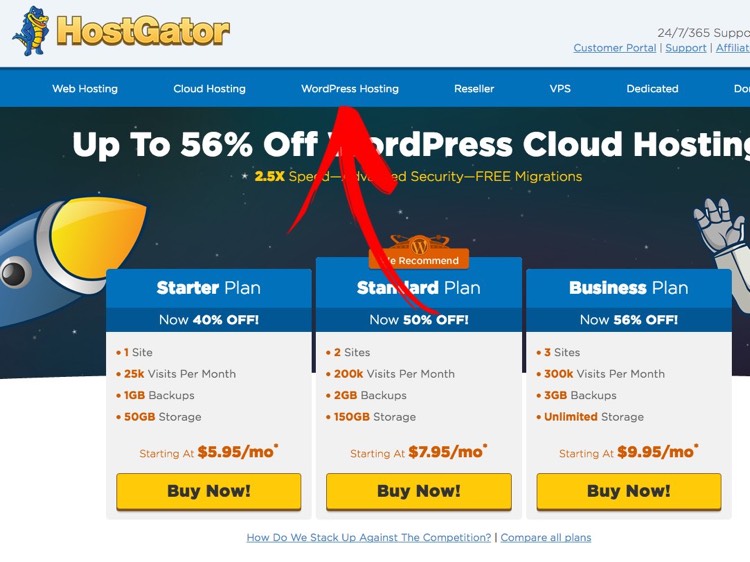
Now, if you’re on the ‘super simple’ path and want something up-and-running fast, your choice is pretty simple. HostGator, for example, offers an entry plan for less than $4 a month, which includes all of the basics and some other aspects like security and the option to tack on emails. Prices shift around, though at the time of this writing, the basic, ‘Hatchling’ entry package is $3.45 a month depending on the term. A year runs about $110, which you’ll hopefully make back quickly.
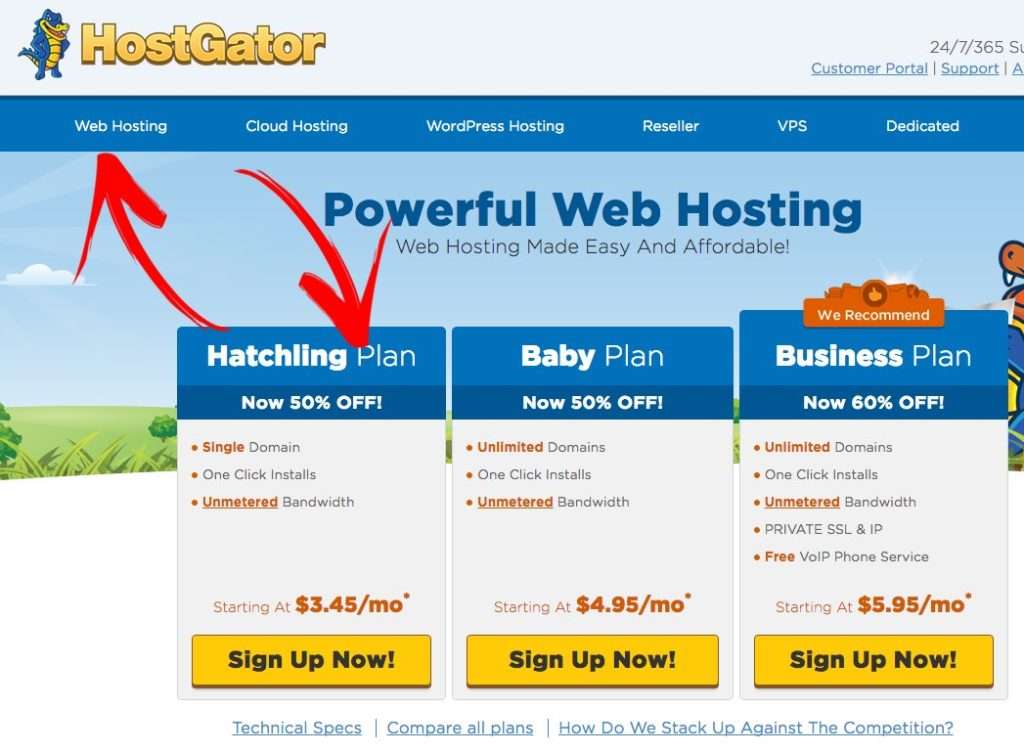
Otherwise, step it up and head over to Optimized WordPress Hosting, which offers a lot more powerful features and options. Remember, if that proves too complicated or overkill, you can always dial things back.
What’s a Shared Plan?
Unless you’re driving serious traffic, you’ll probably be sharing server space with someone else. Servers are typically able to handle lots of traffic, so companies ‘partition’ those servers into subdivisions for a few people to use. It’s sort of like an apartment complex, in which everyone taps into the same plumbing, air, and trash system, though none of the residents need to interact with one another.
Actually, the biggest difference here is that in the shared server environment, you won’t even know your neighbors (in fact, it’s probably best if you have no idea who’s living next door).
There are a few issues to be aware of, however. In shared server situations, you can sometimes get slowed down by a traffic surge happening on another site. Conversely, you can also cause slowdowns for others if you’re getting a spike. This is usually not an issue, or only rarely occurs, but if you sense that you’re getting massively throttled by some traffic-hogging neighbor, call your hosting company to fix the issue.
Additionally, higher-end customization can be complicated if you’re on a shared environment. Sometimes, specialized sites require lots of specialized work, which isn’t possible on a more standardized, shared system.

How to Make a Website
Part VI. Setting Up WordPress.
a. What’s WordPress?
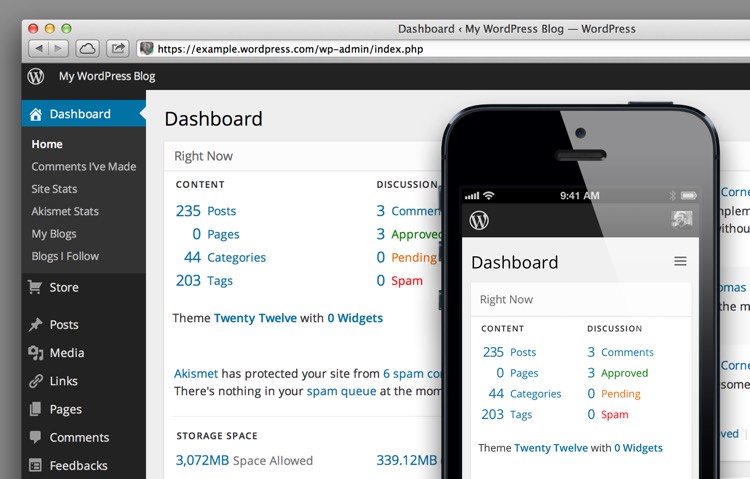
As you’ve started digging into the website building process, the name ‘Wordpress’ has probably crossed your consciousness. So what is WordPress, exactly? Basically, it’s a widely-used backend system that helps to organize an entire site, and combines all of the functionality into one, easy-to-use interface. And, if you learn how to make a website using WordPress, you’ll catapult your site into a seriously professional league.
At some point, WordPress was heavily associated with blogging and bloggers. But WordPress now powers a wide range of different site categories, with a long list of major companies (and artists) using the platform. So it makes great sense to learn how to make a website with WordPress as your platform.
In developer talk, WordPress is what’s known as a ‘CMS,’ or ‘Content Management System,’ which basically means ‘it manages a bunch of different stuff under one umbrella.’ That includes pretty much everything you’d need in an artist site, including images, blog posts, user registrations, comments, forums, music embeds, tour calendars, e-commerce, and design aspects.
b. Advantages of Using WordPress.
There are other competitive platforms in this field, including Joomla and Drupal, though WordPress is quickly emerging as the most-supported and best choice. That’s not to say there aren’t advantages to other CMS platforms, but if you’re just learning how to make a website, they’re less recommended.
Simply stated, the critical mass of WordPress users has grown large enough to make this platform a standard, which ensures lots of support, development, upgrades and all-around solutions to your problems. There are also thousands of ‘plug-ins’ that handle specialized tasks and features, thanks to a massive developer community and user base (we’ll talk a lot more about plug-ins later)
If the thought of setting up WordPress sounds daunting, you can also try a website builder like Wix, Bandzoogle or Squarespace. With those, you won’t be able to achieve the same customization as you would with a CMS platform, but they are much easier and faster to set up.
And when — not ‘if’ — you run into a problem, chances are there’s a forum of geeks that have already solved the exact issue (and posted the solution online). Or, in other cases, the developers themselves realized this problem, and fixed it for everyone.
And this goes way beyond bugs. If there’s a specialized expansion or feature you’re considering, chances are others have wanted the same thing and, in many cases, have developed a plug-in to match your needs (and if there isn’t something already developed, maybe you should invent it and make a lot of money!)
There are other advantages that come with a widely-adopted platform like WordPress, including better all-around support and delivery. But one of the best advantages has to do with design templates, which make it a lot simpler to both construct and design a professional site by letting someone else do most of the work. We’ll discuss those a little later in the tutorial.
(Digital Music News is built on WordPress, by the way, which hopefully supports our argument).
c. Pricing Differences.
For an entry WordPress package, you’re probably looking at a 50% price increase on a hosted package, give or take, depending on how much traffic you need to support. If you’re a developing artist with only modest traffic, this is pretty affordable. Even a few hundred thousand visitors is pretty affordable (HostGator charges in the $5 to $20 range monthly for ‘Optimized WordPress’ packages, which include specialized backend support).
d. Superstar Traffic Problems.
With success comes stress, though, be happy if you have the following problem.
If you’re in the stratosphere of traffic, with more than a million views per month, you’ll need a more heavy-duty solution. Consider this a ‘good problem,’ though there’s more to consider here than just pageviews. And you probably won’t be learning how to make a website by yourself (and you may just be giving top-level guidance and descriptions to others).
For example, what are those users doing on your site? If they are doing more than just accessing ‘static’ information like tour dates and images, you will also have to consider aspects like total bandwidth, storage, and other techie concepts like ‘caching’. You may also need an ops or technical person dedicated to your site.
If you’re in this boat, drop DMN a line at news@digitalmusicnews.com, and we can offer some further guidance.
e. Setting WordPress Up: First Steps
At almost any level and fanbase size, you can easily step into ‘pre-assembled’ WordPress packages that includes hosting and even other aspects like email. You don’t have to spend weeks setting this up, unless you’re building something that’s seriously customized (which goes a bit beyond what we’re discussing here).
So how do you get started?
Essentially, you want to start enabling your WordPress features as offered by your hosting provider, and start feeding it basic information. First you’ll have to activate it, which can typically be accomplished in the setup process, or, via a backend ‘control panel’.
What’s a Control Panel?
Let’s take HostGator as an example. Like many hosting companies, HostGator offers a private dashboard area that allows users to control their pages. In HostGator’s case, this is called a cPanel, or Control Panel, which essentially lets you check stats, add new features, and manage aspects like email and user registrations.
Only a small number of people will ever view your control panel, and your site visitors will never see it.
 Before you can access your control panel, you need to make sure you’re signed up with your hosting company in a package you’ve chosen. After your account is established, you will receive the ‘keys’ to your backend control panel, typically a temporary username and password.
Basic WordPress Setup Steps
Once inside your control panel, simply select ‘Install WordPress’ and you’ll be guided through some setup prompts. Again, different setup processes vary, so sometimes your hosting company will send you a direct setup link, or simply set it up for you (this is especially true with higher-end or more complex setups). If you’re stuck trying to initiate your WordPress package, just call support (they’ve definitely heard this question before).
Now, it’s onto the typical information required to start your account. You’ll need some basic information like:
• The base domain for your installation.
This is simple: http://www.yourbandname.com, or whatever url you decided upon.
• The sub directory you want our WordPress installation to load from.
Typically this is exactly the same as your base domain, typically with a forward slash, like this: http://www.yourbandname.com/. If you want to serve from a sub-folder, which is less common, you can designate something like .
• Your admin email.
This is the central email for all WordPress details, so make sure it’s active and working. Something like admin@mybandname.com will do, or, you can just use an existing email address, like orson1984@gmail.com.
Your admin password, and all password and credential updates, will be mailed to this address.
• Other Critical Details.
The remaining details are pretty easy. ‘Blog Title’ should just be your band name, and you can add ‘Official Website’ if you like. Then, enter the name and other details of your admin, as well as your username. One thing to keep in mind is that things like usernames (and urls) are usually complicated to change later on, but your official page name and other entries are easy to adjust.
Now, start your WordPress installation if you’re required to do that step. You’ll either see a progress bar, or receive an email indicating that everything is ready to go. Usually this setup process is pretty easy, so if you find yourself in a complex software installation quagmire, either you’re with a complicated hosting partner, or you’re doing something wrong (now, if you like rolling your own, more power to you).
Once installed, you will be able to access everything using your username and password, with a really simple entry that looks like something like this.
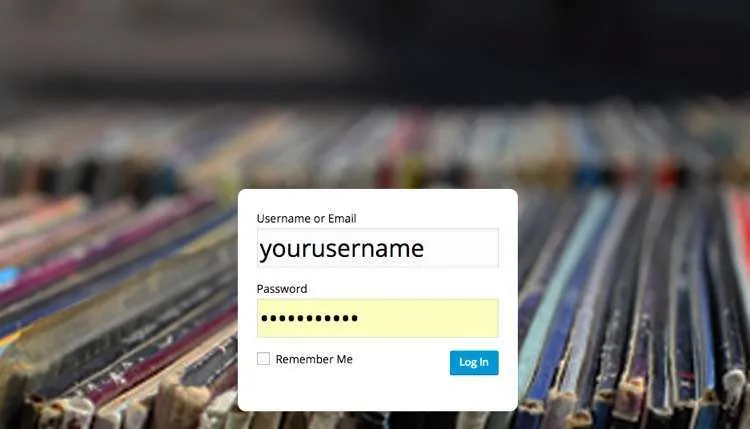
How to Make a Website: A typical WordPress login.
g. The WordPress Dashboard.
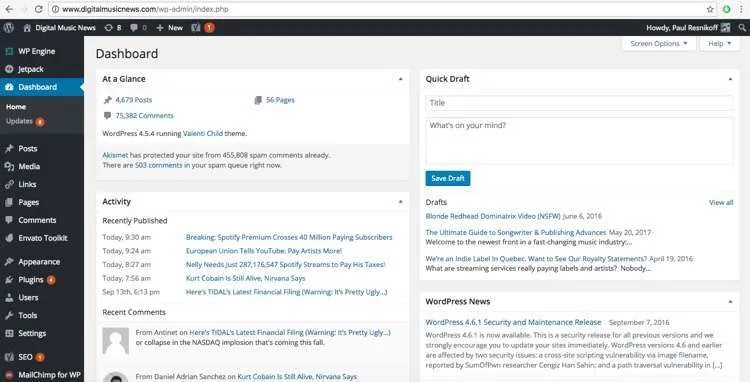
Once set up, it’s time to familiarize yourself with the ‘Wordpress Dashboard,’ which is basically your behind-the-scenes control pad for your site. It’s pretty easy to use, and looks something like this.
How to Make a Website: The WordPress Dashboard.
This is actually the dashboard for Digital Music News, so it’s going to be a little different than your artist website dashboard. For us, the dashboard helps us get a bird’s eye view over thousands of different stories, comments, images, videos, and all sorts of different settings. You will enjoy the same top-level look as well.
One thing to keep in mind is that your fans (in our case, our readers) never see this dashboard. They only see the site itself. It’s sort of like a restaurant: only the managers, staff, and waiters see the kitchen, while the customers only sit in the dining area.
You’ll also note that there’s a special link at the top, which is unique to your dashboard page. You actually don’t even need to bookmark that. Instead, just go to your site, and sign in with your username and password, and you’ll see a bunch of controls pop up, like this.
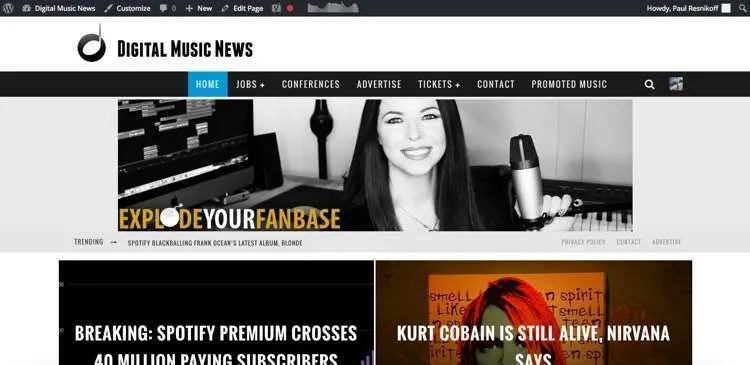
How to Make a Website: Logged Into WordPress.
See that section at the top? That horizontal black window is only visible to admins, authors and other staff. The rest of the world only sees the site below the black ribbon.
Now, to access your Dashboard, just click on the upper left hand corner, and you’ll see a bunch of options, Like this:
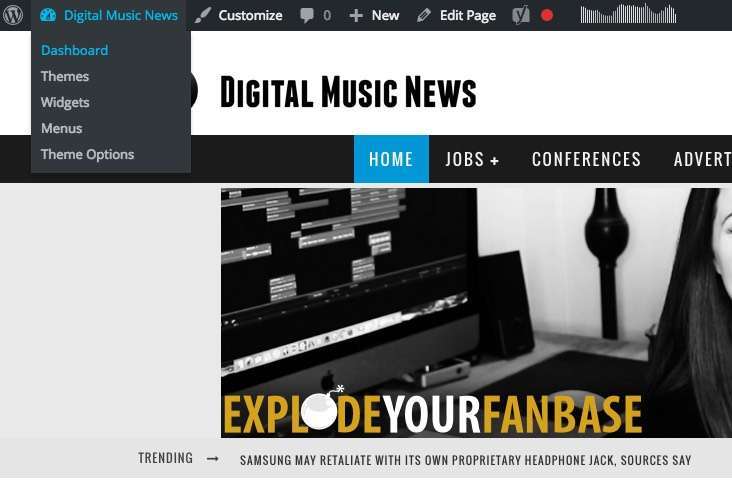
How to Make a Website: Quick Dashboard jump points.
Click ‘Dashboard,’ and joila!… you’re there.
Now, let’s start creating your epic site.

How to Make a Website
Part VII. Build Plan: Deciding Your Iterations.
In the tech world, the term ‘iteration’ has become popular. Basically, it refers to building something out in distinct, manageable phases, instead of trying to release a massive, polished product in one giant release. Turns out this is a great approach while learning how to make a website.
This approach doesn’t work as well with products like cars (sorry, we’re still working on the back seats!) But, it’s great for things like apps and sites, where you really want to establish a basic level of initial functionality first, then get people reacting and testing things out as you build the bigger vision.
Here’s the general rule: when it comes to interating, your fans probably won’t complain about missing features. What they typically complain about are things like bugs, bad information, or out-of-date information (i.e., not telling 100,000 fans that you aren’t playing Coachella, after all). So you should be figuring out how to make a website live-time, and wasting their time, but it’s actually okay if things aren’t 100% perfect.
Sketching out a few initial iterations also makes the build process manageable, and keeps you motivated with reasonable, achievable milestones. Consider the following example iterative plan, which is broken down into phases.
Phases 1: Basic Site Launch
• Design completed.
• Simple navigation.
• Images enabled.
• Tour dates section.
• Blog started with comments enabled.
• Music and video embedded.
Phase 2: User Uploads, eCommerce
• User image uploads (social media pulls, direct upload)
• Greater video integration.
• User registrations and forum.
• Integrated ticket sales.
• Merchandise store ready.
Phase 3: Forums
• Vinyl store launched.
• Fan forum launched.
• User analysis (GeoIP analysis, traffic analysis)
Keep in mind, this is just a sample approach on how to make a website. But by layering in greater functionality with each version, you ensure that a beautiful site is not only constructed, but refined properly as you go.
Throughout, it helps to have a big vision of what you’re trying to create. Then, piece it out into manageable phases with a quick specification, starting with a ‘Phase 1’ document.
If you’re working with a team, that specification will be invaluable towards communicating what you are looking for. It can also be a great shared document to update and evolve the concept. But getting the architecture and ideas committed to some document in a concrete form will vastly accelerate your development time.

How to Make a Website
Part VIII. Designing a Highly-Functional, Beautiful Site With WordPress Templates.
The next challenge you have is how to make a website with incredible, smashing design. What do you want this thing to look like?
If you’ve done a lot of the pre-thinking above, you’ve already pondered a lot of aesthetic possibilities. And, you may even have some concrete ideas in your mind. Now, it’s time to take what’s in your mind and turn it into reality.
a. Why Design Templates Make Sense
There’s a dirty little secret on how to make a website that’s smashingly great, and doesn’t take months to build.
At this stage, you have two options: you can design the site entirely by yourself, or, you can reach out to the massive design and developer community for an already-designed template. Frankly, the latter option is far more preferable, especially for an initial launch. The reason is that the internet now connects millions of talented designers and development teams together, with tens of thousands of pre-built templates that are ready-to-use.
Not only that, there’s a very high likelihood that you’ll not only find a template you’ll love, but it will be really easy to use. You might be amazed at how professional of a site you can create with the right template, even if you’ve never created a site before. You’ll definitely impress your friends with a template-based approach (not to mention your fans).
There are other advantages to consider as well. As brilliant as your design vision is, pursuing a ‘roll your own’ path will probably add months to your development cycle. In terms of cost, you will need at least a few more thousand dollars, not to mention a designer well versed in both design and the WordPress backend.
That said, if you have a lot of resources and a desire to do something highly customized, then a dedicated designer (and possibly, a separate web developer) is the best choice. In that case, you’ll want to start interviewing potential designers, and start developing a detailed specification for them to consider.
Designers can be found through a number of different avenues, including direct referrals (which are always good). Other resources for designers include Design Crowd or Upwork. In every case, make sure to pore through your prospective designer’s portfolio, and make sure you like the style.
And, make sure they know how to design for a WordPress CMS backend, otherwise you’ll be slicing and dicing images — or, more likely, hiring someone to do that for you.
 Warning! At this juncture, you may receive offers to do free design work, either from friends or fans. You, or someone in the band, may even want to do the design work yourself on Photoshop. That may sound tempting, but unless the person really knows what he/she is doing, including the development side of things, the results could be disastrous. And a lot more expensive than free.
Otherwise, it’s far easier to go the template route, which are predesigned and can actually be customized (or quickly replaced and refreshed) at a later date.
b. Design Templates: Getting Started.
Choosing a design template is actually a really fun process. It’s really similar to shopping for clothing, furniture, or a Persian rug, with thousands of designers and possibilities out there. If you’re shopping for the perfect leather chair for your apartment, you could theoretically look at thousands of possibilities. Well, exactly the same is true when it comes to design templates.
So where should you begin?
There are actually lots of different design template marketplaces, including the WordPress community itself. Within the WordPress Dashboard, just click ‘Themes,’ then ‘Add New,’ and you’ll be shuttled to a selection of endless themes.
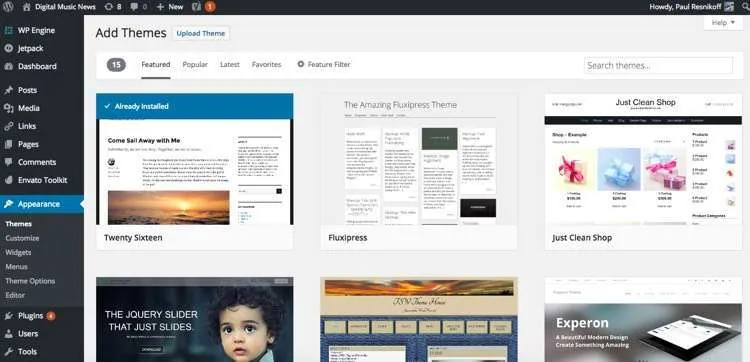
You’ll quickly notice that there are different types of themes, with most categorized into different buckets. Basically, the game is to try to match your first phase specification to a premade template, with some alterations required. If you find yourself totally overhauling or trying to transforming a template to fit your needs, you’ve probably chosen the wrong template.
c. Circling In on the Perfect Template
Be prepared to lose yourself in the possibilities here, all the while setting aside your favorites for later review. You might need a few hours to find something you love, but it’s worth the time commitment. If you see something you really like, just hit ‘Install’ and it will be saved to your WordPress instance (don’t worry, ‘Install’ is not the same as ‘Activate’).
With each design template, you can review all of the features and customization possibilities, considering every aspect for a match. Once you have at least a half-a-dozen possibilities, you can start to scrutinize them based on their characteristics and how they fit your vision.
![]()
Pro tip! One cool thing about templates is that you can typically switch into a new template, especially if your site is simpler. The more customized and advanced you get, the harder that will become, but, c’est la vie.
Narrowing Your Search Criteria
Now that you’ve started to get a basic familiarization of templates, you can see that there are all types of different designs. Design and function are tightly integrated at this stage of internet, and there are lots of templates that are trying to serve a totally different function than an artist website. An accounting website, while great for accountants and tax preparers, isn’t exactly the functionality or vibe you want.
So, it’s time to start narrowing your search a bit!
Try some search terms that make sense, like ‘music,’ ‘artist,’ or ‘musician’. See what pops up. Artistic sites are typically more visual, and less packed with words. Makes sense, since you’re an artist. There are actually tons of different templates that are geared specifically towards artists, musicians, and bands, not to mention other specialties like composers.
These templates are designed to optimize and highlight what you are offering and who you are trying to reach, so be sure to spend the time examining specialized templates. In some cases, you can even speak with the developer and contribute suggestions to the next template build.
So jumping in, let’s take a quick scan of the initial possibilities.
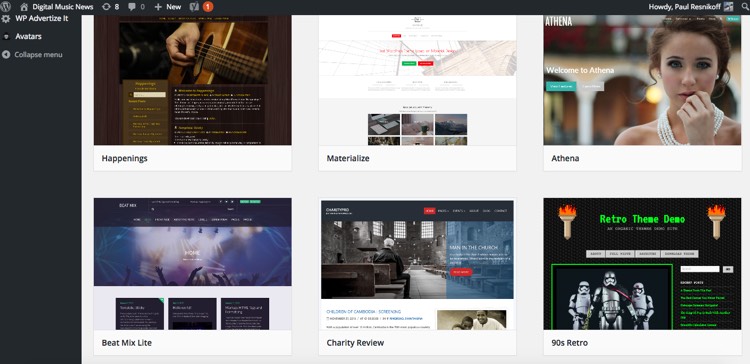
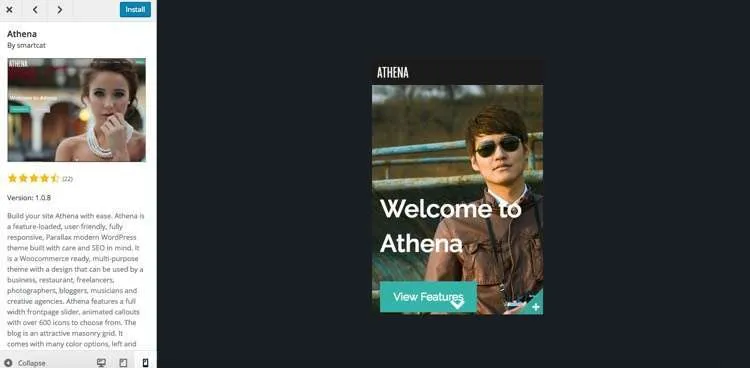
As an example, let’s jump into the ‘Athena’ design template, and see what we think.
As you’re reviewing the template, you’ll notice that you can review all sorts of menus, variations, and preview how the site will look on different screens (like iPads and mobile devices). We’ll get into mobile versions later, but the simple rule is that if the theme you’re reviewing doesn’t have a mobile version, skip it.
For example, here’s a feel for how Athena’s front page looks in a mobile browser.
Further Narrowing Your Search Criteria
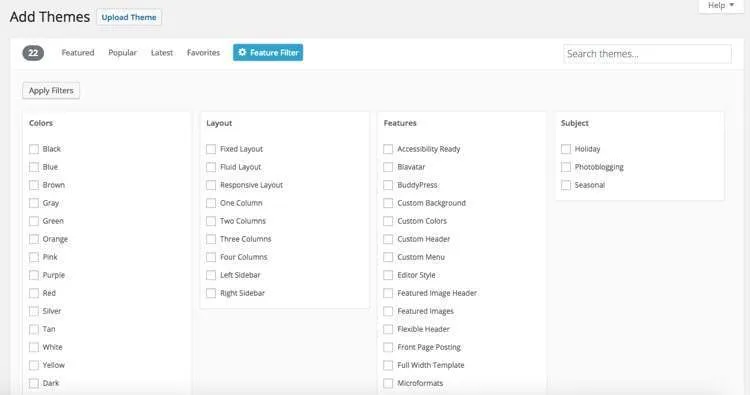
After rifling through a few dozen templates, or a few hundred, you’ll start to get lots of different ideas on what you want in a template. Do you want different columns, or something column-less? Do you want a darker theme, something with lots of green? How about a right column?
If you want to narrow your search along more specific criteria, just hit ‘Feature Filter’ from the ‘Add Themes’ section of the Dashboard.
d. Template Libraries
Want to see more templates? Thousands and thousands of more templates? More music-specialized templates with integrated audio and video embedding?
Well, you’re in luck, because there are lots of entire libraries of templates that you can scroll through, often with far more advanced designs and functionality than what’s presented within the WordPress interface.
Two libraries that jump to mind are Theme Forest (themeforest.net) and Elegant Themes (elegantthemes.com). Both of these libraries offered templates for a fee, as well as reviews and full details on what various templates offer.
In some cases, you can purchase the exclusive rights to a particular theme, and take if off the market. But that costs extra, potentially a lot more. In all reality, that’s not something you need, but it’s an option.
e. Back to embeddable audio and video
Earlier, we mentioned embeddable audio and video as important considerations for your site. Years ago, this was notoriously hard to pull off, and really difficult for fans to figure out. Now, it’s completely easy, and the best part is that lots of templates already have customized slots and solutions for embedding your audio and video. You’ll see lots of options for incorporating SoundCloud, YouTube, Vimeo, or self-loaded multimedia, all of which will vastly simplify your task here.
There are even music-focused templates that includes entire music players, download aspects, and other amazing functionality (here’s one from Muzik). There’s some amazing stuff out there, and chances are, there’s something that will match what you’re looking for.
The developers behind these templates have done the hard work for you, and have made it affordable. All of which means you can quickly get back to your competitive advantage: making music, instead of figuring out how to encode, upload, stream, or present it.
 Warning! Flash was once commonly used to build sites. But these days, it’s best to avoid incorporating anything Flash-based in your site. That includes audio, video, and especially ‘Flash intros’. Otherwise, you are sending your users back to the mid-90s and probably crashing their browsers in the process. And nothing Flash-based even works on iPhones, if you needed another reason. Avoid.
f. Installing an external template.
If you find a WordPress template you like from an external library, the next steps are simple. After paying for the theme, simply download what’s known as a .zip file of all the theme elements. It’s basically a package of every piece of code, image, and features the theme contains. Then, just upload that .zip from your desktop into your WordPress installation.
Just hit ‘Upload Theme,’ and follow the prompts.

g. Vetting the Finalists
Ignore Reviews and Updates at Your Own Risk!
One thing that is very important when selecting a theme is to carefully review user feedback and check to see that there is solid support and routine updating. If you find a template with a 1-star rating, it means there’s a serious problem. But even highly-rated templates should be checked out, because there may be some lingering complaints that could affect you.
In terms of support, you want to make sure that there’s someone home to help you through any installation issues. And, although you sometimes have the option to take a theme off the market, it’s actually more beneficial to work with a heavily-used template. Sure, there will be a few similar-looking templates to your site, but also a lot more people in support threads and forums.
The crowd is your friend in situations like these.
Choose Wisely…. But Theme Decisions Aren’t Fatal
After all of your hours and hours of reviewing, you’ve finally picked a template you love. Ideally, this theme will last you for years, though sometimes, after digging into things, you realize there are limitations. This can happen, though keep in mind that you can always go grab another theme, and the only thing you’ve lost is the cost of the theme.
It’s all part of the refining and build process: sometimes you face a small setback, but it only helps you build a better product in the end.
h. Bringing Your Theme to Life
Picking the theme is actually harder than implementing it. But, once you’ve made your choice, installed your selection and activated it into your WordPress instance, you’ll have all sorts of different options to play with.
Constructing the Skeleton.
Now, going back to the initial sitemap that you put together, it’s time to start constructing that skeleton in reality. Keep in mind that you are matching your tightly-aligned theme to your vision, but there will be some differences and extra options you hadn’t considered. That’s completely normal: after all, this template was designed for projects like yours, but you never had an in-depth consultation with the team that built the template you chose.
Typically, you can start assigning different sections to match your initial layout, while pondering fine-tuned questions like what sections should prioritized in your navigation, what first greets the fan, etc.
At this stage, forget about the niceties! A beautiful building doesn’t look pretty during construction. But laying the framework and organization is critical. Keep in functional, and keep it basic.
Start filling things in.
Now, it’s time to start loading in images, filling out more text, and filling in your sections. Actually, you’ll be amazed at how quickly things come together if you’ve done all the prework and invested the time to find the perfect theme.
Here’s a quick starter page that can easily be customized using the ‘Raaga’ theme for bands and musicians (it’s available on Themeforest here). This theme has quick sections for side-scrolling content, which you can easily start filling out with uploaded videos, tour date announcements, as well as a general introductory page.
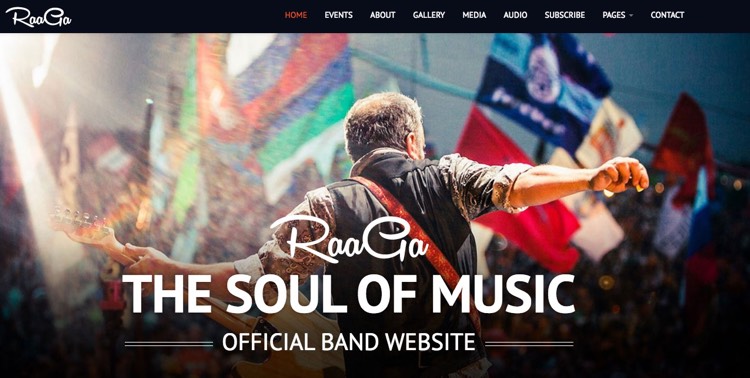
Maybe you have a great shot of yourself performing in front of a huge crowd with flags waving around, while the sunlight delicately splashes onto the stage! Or, perhaps you want a group shot. Just upload it, change the text, and you’re ready to rock-n-roll.
Plug a show, which will eventually link to your ticket-selling solution…
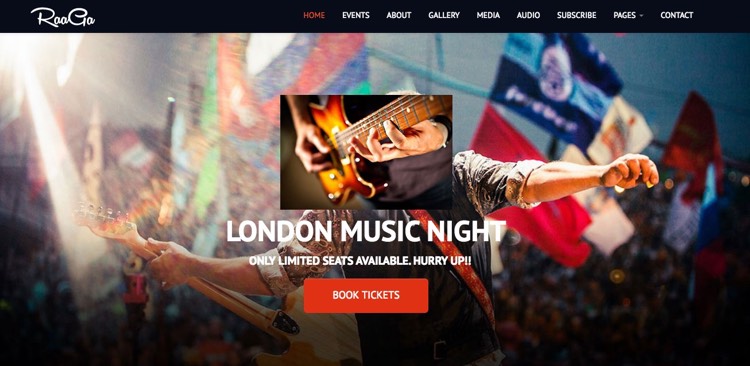
And, let’s pump up a quick video into the mix, shall we?
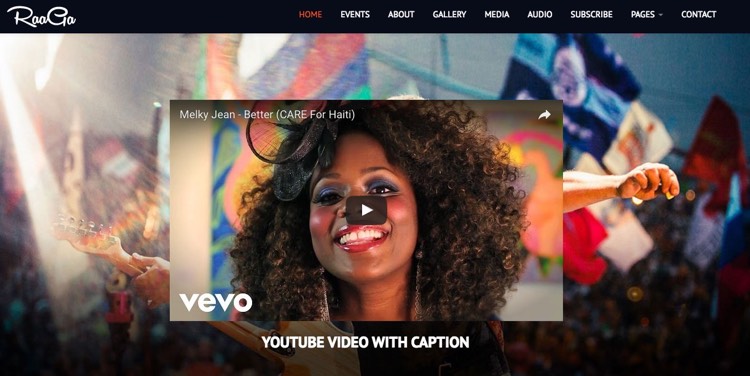
Throughout this process, notice how the navigation has already been laid in. It’s best to load in stuff like videos and hi-res images after you’ve determined not only you site organization, but how’s it going to be presented to your fans.
Start filling in all the images, text, videos, contact information, or whatever other pages you’ve designated for your first version, and you’re more than halfway towards completion.
Start customizing and refining.
Now, it’s time to start tweaking every aspect of the site, down to navigation color, size of your images, and figuring out every last image.
Here’s a really quick sample of just one of the customizations you’ll be walking through. Just have fun tinkering through the different possible variations, which you can see live time on your preview site.
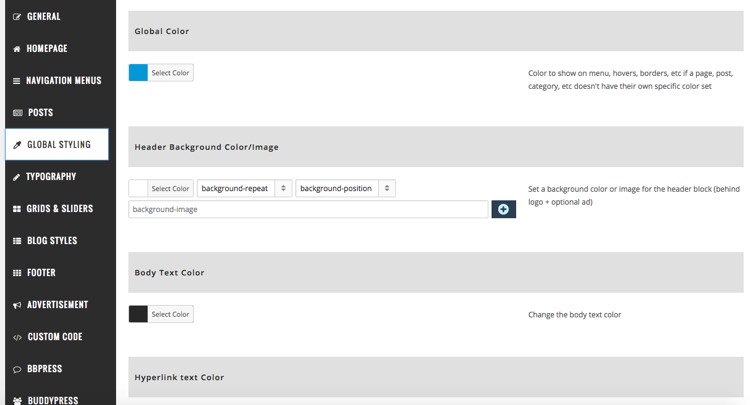
There are dozens, perhaps hundreds of different tweaks you can make during the setup process. Basically, you are filling in, moving around, and decorating a lot of different sections and boxes. You can activate or deactivate certain areas, and determine exactly how you want things to appear.
Just constantly experiment, have fun, and keep your overall vision and framework in mind. Of course, at this stage, everything is negotiable, so feel free to see how things work. But all of the prework you did is now a powerful guide as you manage a million different options.

Pro tip! Be sure to take a big step back every once in a while. Take a walk, take a drive, take a day off, whatever it takes to distance yourself from the weeds and refresh your outlook. Just don’t STOP building, or leave things stale for too long.
i. Staging versus Production Servers.
Some hosting partners offer what’s called a ‘Staging Server’ to help you test things out in a private sandbox. The Staging Server includes everything from color palettes to new functionality, all of which should be tested before it goes out to the world. And when it comes to more complicated functionality and processes, it’s really nice to see how it performs (or doesn’t) before it goes live.
Once you love the way something looks, you can push it to your ‘Production Server,’ which is what the world sees (it’s live!)
Staging servers also have some other important functions, including backing up your live production environment. That way, if something gets accidentally mangled, hacked, or otherwise disrupted, you can easily fall back to your staging environment.
Ask your hosting provider if this is something you can take advantage of. If so, you may have to pay more. But you’ll be given an easy interface and controls to take advantage of your staging sandbox. It’s a really nice feature to have.

How to Make a Website
Part IX. Mobile (Responsive) Sites.
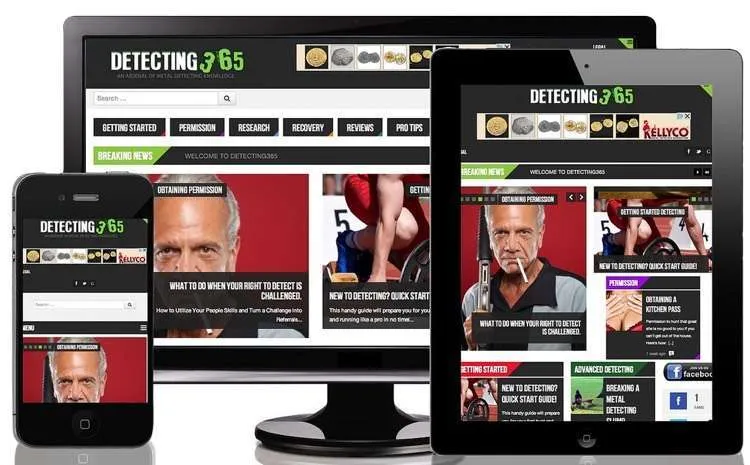
How to Make a Website: Example of responsive design, from Detecting365.
Water conforms to the shape of its container. And so should your site (for the most part). This part of the tutorial will delve into how to make a website that fits on nearly every screen.
This really depends on your audience, but chances are a massive percentage of your fans will be viewing your site on mobile. That’s because a massive percentage of people view the web on mobile these days.
Keep in mind that fans will be checking your site for bits of information, wherever they are. Are you playing in my city this weekend? Open phone, check Google, go to your site, BAM: yes, you are. Book tickets. Money in your pocket, fans at your show that weekend.
These scenarios will play out again and again, and the younger your crowd, the more likely they’re hitting your site on a cell. So, your site must work on mobile as well as desktop.
a. What is ‘Mobile Responsive’ and why does it matter?
So how can you make your site work on both? Most up-to-date websites are what’s called ‘responsive,’ which means they work on desktop, mobile, and other screen sizes (like tablets). It means the elements automatically adjust to fit and make sense, whatever the screen size (though, at this stage, people are still working out how sites and information should be presented on super-tiny screens like the Apple Watch, if that becomes a thing in the future).
There’s a really simple way to achieve responsiveness: just make sure it’s properly baked into the template you choose. You can see how every page will look in the template demo before you purchase it, and, during your build process.
For starters, it should be completely functional across all screens. Then ask yourself whether you like the way the elements are getting reconfigured to meet the differing screen sizes.
b. Multi-screen testing.
Make sure to keep testing during your build process to ensure that the presentation is coming out clean. Don’t just test iPhone or Android, or forget to look at your site on an iPad. Unless you’re testing lab, you won’t have everything, but the good news is that your friends will. Someone in your circle has an iPad, Android, iPhone 5, or PC, and can do some quick checking along the way.
It’s really that simple! You don’t need to get too complicated with this, though keep in mind that you’ll probably have to make some tweaks here and there to accommodate different devices. As for fringe devices like Blackberry, older iPhones, and ancient computers, that’s your call. Typically that crowd is smaller than 1-2% of your audience, so it may not be worth worrying about.
c. What About Apps?
Mobiles apps are typically distinct from your site, and really require a separate build process. In fact, it would probably require an entirely separate tutorial just to build a serious app.
But wait: do you really need an app?
That’s a tough call, but initially, the answer is no, you don’t. Apps are typically specialized around certain functions, like dating (Tinder), restaurant reviews (Yelp), listening to music (Spotify), navigation (Google Maps), or gaming (Pokemon Go). For stuff like referencing band information and updates, a site is a surprisingly functional and effective solution (and as we’ll show you, can even be baked into a ‘app-like’ solution).
The reality is that you probably don’t need a full-blown app until you’re offering more specialized functionality, and even then, it’s questionable. Why? The people that download your app are unlikely to return regularly, simply because there are so many other apps cramming for their attention.
That said, there have been some really fun artist app concepts over the years. Maybe the most famous one comes from T-Pain, who embraced his auto-tuning ways with an interactive, auto-tuning app called ‘I Am T-Pain’ back in 2009.
So, maybe you want to create the next Pokemon Go and rally all of your fans around that. Perhaps the winners get a huge show to celebrate, you get mass-coverage in every major publication, blow up your profile, and make millions as a result (while having a lot of fun).
Great! But, app-building is largely a separate task, and shouldn’t be melted into your website build process.
Well, not exactly…
d. How to make a website with a quick-n-dirty, HTML5 companion app for iOS/Android.
Now, here’s a really snazzy way to hack yourself into something that looks and feels sort of like an app. There’s something called HTML5, which is an updated codebase for building sites that can easily be ‘compressed’ into something that looks like an app. To see if this functionality is enable, just check your template.
If it is, you’re ready to roll your pseudo-app! Basically, users will have what looks like an app parked on their smartphone deck, which actually just opens your mobile-enabled site. Actually, a lot of different web-focused companies have started shifting towards this approach, after realizing that most people are increasingly connected to the internet, and tend to forget the apps they downloaded (if they downloaded them at all).
With an HTML5-enabled site, you can actually prompt first-time users to park an app icon on their phones. Then, they have the option to visit you via the ‘app,’ or simply check out your mobile-responsive site through Chrome, Safari, or some other mobile browser.

How to Make a Website
Part X. Prepare to Launch!
a. How do you know it’s ready?
After you’ve laid in all of the pages according to your initial phase, and filled in all of the details to your satisfaction, it’s time to get ready for launch. Plenty of details will remain unresolved, not to mention features and sections you want to add. But the best practice is to push things live if everything is close and functional.
‘Close’ and ‘functional,’ are critical words at this stage. If you’re a perfectionist (which is sometimes an asset, oftentimes a handicap), you may be tempted to delay your launch until every last detail is resolved. Well, there’s an old adage about this very thing: “don’t let perfection be the enemy of good.”
Actually, that’s the entire rationale behind the iterative build process discussed above. It’s great to be ambitious and think big, but not if it pushes you into a never-ending project. Not only will you hate working on it, you run a greater chance of it never getting it done.
Better to get something out the door with a few warts, and give something to your fans. Chances are they’ll be very forgiving, especially if the bugs are minor. And the best part: they’ll get to see you constantly building and improving things, along with your smashingly great music releases.
b. Transferring Your Domain Name Servers.
You’ve already reserved your domain name (and if you haven’t, go back for that part of the tutorial). Now, it’s time to point them towards your new site.
What does that mean? Domain names, like yourband.com, are really just friendly names put on top of a number like 723.83.932.4, which is known as an IP address. So, when you type yourband.com, that name is then mapped back to a number where the site is actually hosted.
In response, the user gets a response back from the server, which is where your site lives. Someone makes a call, from practically anywhere in the world, and your hosting provider answers with your updated, awesome site.
So, once you properly connect your DNS system up, any visitor to your domain name will go to the right place.
If you’ve reserved your domain name through your hosting provider, this is actually a very easy step. Just tell your hosting provider to match your domain name to what are called ‘nameservers,’ and that’s basically it.
If you’ve reserved your domain name somewhere else, that service (let’s say networksolutions.com or Go Daddy), will have a special section where you can simply enter the name servers that match your host. First, get the proper nameservers from your host by contacting support, or looking in your welcome email or control panel.
Then, enter those numbers (there will be two) into the designated section with your DNS provider. The matching looks something like this (specifically, if you were connecting from GoDaddy to HostGator):
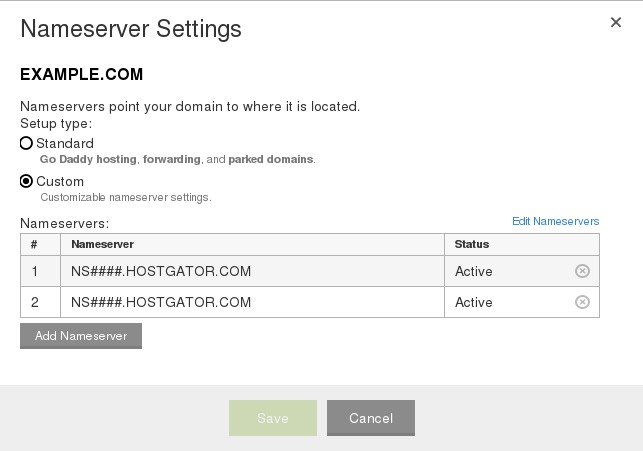
In this case, the NS###.HOSTGATOR.COM address is just a placeholder for the actual name server you get from HostGator, which will end in .HOSTGATOR.COM.
For additional address variations, just hit ‘Edit Nameservers’ and you can direct other sub urls to different places. For example, dev.yourbandname.com. And, be sure to enter both www.yourbandname.com and yourbandname.com separately, as your fans will undoubtedly enter both (it’s a common issue that crops up).
c. Replication
Now that you’ve set the signposts in the proper places, you might have to wait until things propagate. DNS shifts are instant in many cases, though it’s possible that it could take up to 72 hours for every last nook of the internet to be effectively switched over. And with 3.5 billion people on the web and counting, that’s pretty good (especially considering that 72 hours is the outer extreme in terms of timing).
Then, crack the bubbly, and tell the world about your new site!

How to Make a Website
Part XI. Setting Up Email.
a. Why Email Matters.
One of your most powerful marketing and engagement weapons is email, simply because you get to control the message, delivery, and frequency. But most importantly, you control your list.
On Twitter, Facebook, Instagram, and Snapchat, your followers are actually owned by someone else. Which means the rules for how you can contact those followers is determined by someone else. In a more extreme situation, a platform can shut down, lose popularity, or block your usage, all of which severs your valuable connection to an audience you’ve built.
Just remember: once upon a time, everyone was reaching their fans via MySpace. And every Facebook follower actually received your message. Given how fast the web evolves, there will undoubtedly be other unhappy situations like these in the future.
By stark contrast, email has only gotten better over the past 5-10 years. Gmail helped to revolve nagging spam problems, and platforms like Mailchimp helped to institute easy subscribe and unsubscribe standards. Sure, people are still overwhelmed by their in-boxes, but if a fan subscribes to receive your email, they generally want to hear from you. And that’s a connection that matters.
b. Setting up your @mybandname.com email addresses with Gmail.
The really cool part about having your own domain name is that you can also map those to your email addresses. So, if you own www.mybandname.com, you also get to send emails from myname@mybandname.com, hello@mybandname.com, newsletter@mybandname.com, etc. Everyone in the band can have their own address, and your team can easily manage a centralized list.
Effectively, once you learn how to make a website, you’ve also learned how to make a simple, easy email system.
A super-simple way to get started on this is with Gmail and Google Apps for Work. It’s fast, easy to set up, and easy to access from anywhere. And, if you already have an existing Gmail account, you can easily toggle to another account created for your band correspondence.
Basically, Gmail will be handling your email from their servers via Google Apps for Work, while making an email ‘fetch’ to connect back to your DNS. That system avoids strange forwarding or address masks that could trigger spam filters, which are bad (unless you’re totally spamming, so don’t do that!)
In order to make the call back to your hosting provider, you’ll need to modify what are called ‘MX Records’. Basically, this is similar to mapping your DNS to the proper name servers. You’re telling Gmail where to go to find your domain name, and giving Google permission to handle your email accounts from that location.
As you do this, you’ll need to tell your hosting provider what actual email addresses you want. Email settings are typically contained within your Control Panel. For this section, we’ll take Hostgator’s cPanel as an example, and march through the steps. If you’re on another hosting provider, there’s likely a similar process for connecting up Gmail accounts.
Separately, you’ll need to initiate a Google Apps for Work account. There’s a modest monthly charge that increases depending on how many accounts you need to manage. But, you can easily start with a 30 day trial, and you only pay for the number of email accounts you actually need.
Once, you’ve done that, you’ll have access to a Google Apps admin dashboard.
 Pro tip! If you purchased your domain from Google, you don’t need to update anything and you can start using Gmail now. Just log into mail.google.com with your Google Apps username and password. Or, from the Google Admin console, just click ‘Apps App Launcher’ in the top-right corner, then ‘Mail,’ and proceed.
Now, let’s start with the Google Apps control panel. Just follow these steps:
1. Log into your Google Admin console.
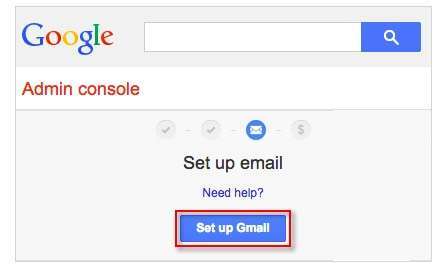
2. At the top of the console, also called the dashboard, find ‘Set up email’. Click ‘Set up Gmail.’
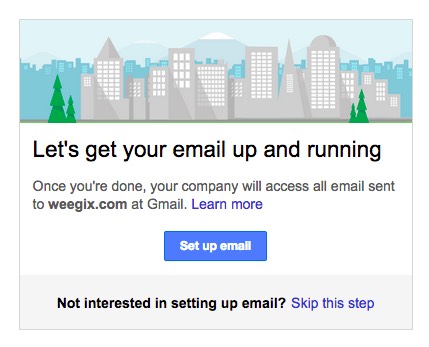
3. Click ‘Set Up email’
4. Log into your Hostgator cPanel.
5. Back to the Google Apps for Work admin interface. Locate the ‘Google Apps Setup Wizard,’ check the ‘I signed in to my domain host’ box.
6. Back to your Hostgator cPanel, scroll down to Mail, and click ‘MX Entry’.
7. Back to the Google Apps Setup Wizard. Check the ‘I have opened the control panel for my domain box,’ and then click next.
8. Back to the HostGator cPanel, delete your existing MX records.
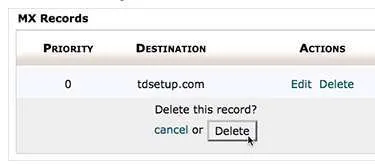
9. Back to the Google Apps Setup, check the ‘I have deleted existing MX records’ box.
10. Back to cPanel, start adding these MX Records exactly, with the corresponding priority levels.

11. Back to Google Apps, check the ‘I have created MX records with these values’ box.
12. Still in Google Apps, check the ‘I have saved the MX Records’ box.
13. You’re verified! It may take a few hours to replicate, but oftentimes, it’s instant.
14. Now, bookmark admin.google.com, use your Google Apps username and password to enter. Just click the ‘App Launcher’ icon followed by ‘Mail.’ From there, you can continue to tweak your settings, including passwords for specific mail accounts.
15. Start accessing your Gmail accounts from mail.google.com!
(and, if you need more detailed documentation on this, head over to this Google Apps tutorial here).

How to Make a Website
Part XII. What’s Bandcamp?
As you’ve plotted out your digital strategies, you’ve probably come across Bandcamp. Or, you may have been visiting the site for years to purchase music from your favorite artists. Basically, Bandcamp is a great resource for setting up a quick store, complete with recordings, e-commerce, and other goodies. That includes streaming, and some really cool features that include comprehensive analysis and the ability to offer a limited amount of free listens before requiring payment.
Actually, a lot of artists simply shortcut the entire process by only building a Bandcamp site, which is one option. The downside is that this leaves you without all of the customizations that you get from your own site, not to mention the full control over your own domain. Selling stuff is also Bandcamp’s forte, which some artists find confining.
That said, there’s definitely a lot of traffic and a great community on Bandcamp, not to mention some fantastic features. That’s why some artists choose to build out a Bandcamp store, while pointing heavily towards their main, motherlode artist page.
So how do you make a website that deftly incorporates Bandcamp?
Amanda Palmer, one of the most celebrated ‘do it yourself’ artists of the past few years, has perfected this approach. Here’s what Palmer’s Bandcamp page looks like (notice the heavy link backs and navigation towards her core site, amandapalmer.net).
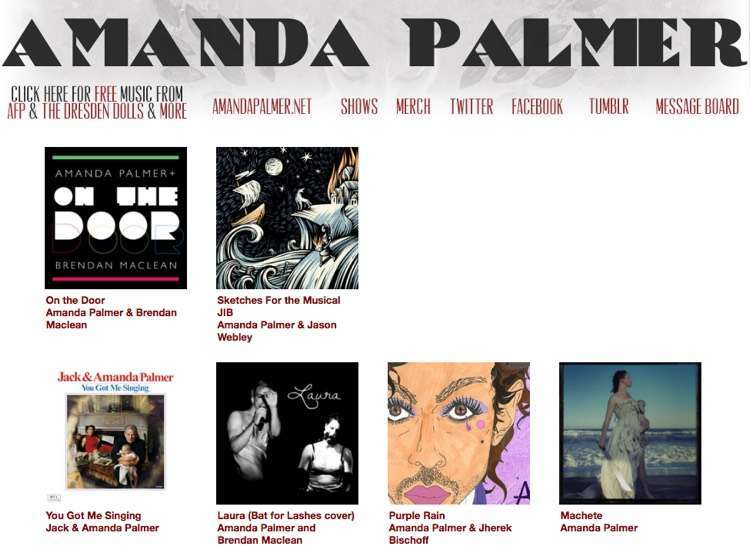
How to Make a Website: Connecting Bandcamp.
All of the various albums from Amanda Palmer’s Bandcamp page go to Bandcamp-powered commerce pages. But notice how most of the top links go to either Amanda’s official website or other platforms like Twitter or Tumblr. Even ‘Merch’ goes back to amandapalmer.net, as the artist wanted to control that part of her commerce herself.
And, here’s the official Amanda Palmer site (which easily looks like something you could easily build using this tutorial).
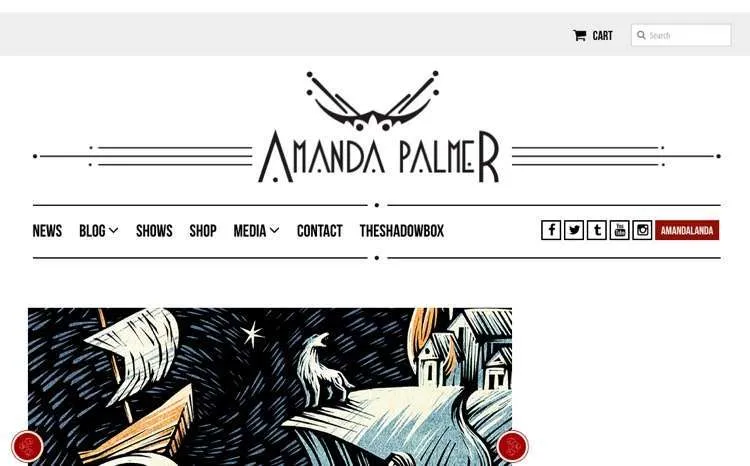
Amanda Palmer’s homepage: now that’s how to make a website!
It all goes back to the hub-and-spoke strategy that we outlined earlier. It keeps you in total control of your core site, while connecting all of the features of other useful platforms. And if it works for Amanda Palmer, it will probably work out for you too.

How to Make a Website?
No, it’s all about how to make a website that keeps growing, expanding, connecting, and surprising your fans. This is just the beginning.
Now that you’ve constructed your first stage artist website, there are so many more aspects to dive into. That includes analytics, Google search optimization, and bulk email management, but we’ll save those for future tutorials. Once you’ve learned how to make a website that really connects with your fans, you’ve opened up a myriad of new possibilities for your career.
Thanks for letting us guide you through how to make a website that really kicks ass. And a big shout to HostGator for making this all happen. Check them out, and use code ‘DMN2016’ for a 25% discount.
And, if you have any questions, corrections, or suggestions on this tutorial, just throw them in the comments below. We hope to keep this a long-lasting, evergreen resource for thousands of artists.


Paul, Web site building, organic or paid search engine visibility, social media percolations skills to build bigger and bigger fan base SHOULD NOT BE EXPECTED from brilliant early stage musicians! They have no cash and most will never become even average web navigators.
TIME TO STOP UMG established streaming and advertising music nerd land!
Conversion of 100,000 Radio stations and few music pulverizing streamers to simple music stores SHOULD BE OUR TOP PRIORITY.
DJs CAN and SHOULD scout the best and convert great music to $100B business by 2020.
I’ve built hundreds of musicians websites in my 20 years as a full time web designer. These days about 90% are in WordPress. This article makes it sound easier than it is – there are thousands of plugins and themes to choose from. DIY is not for every one – it will take longer than you think, but you if you enjoy it then no harm in trying! Most WordPress themes also require some amount of customization to make them look great.
Pro tip! -> Great photography it critical. Having an awesome photograph or artwork will go a long way in making the site look professional.
Also – remember this is an advertisement for HostGator. They are not the best in my opinion. Also, there are other DIY alternatives such as Bandzoogle or Squarespace that do not require hosting or WordPress that are more expensive per month, but much easier to use.
this is like a college class.
[…] Paul Resnikoff also posted a thorough guide on how to build a website tailored specifically for musicians and bands. Here’s a quick […]
A few beginner’s questions please: 1) What is the format standard for goal of uploading songs to a website intended for downloading purchasing? 2) Since I use a Tascam 24-bit recorder, will I need software to convert to the format used for the aforementioned goal? 3) Are there free or inexpensive means to distribute others music without percentage fee? 4) Instead of my seeking to make a supplemental income from fee-charging for distribution of clients’ songs, is a business model solely based on advertising revenue a realistic means of generating income–$500-$1000 a month as a goal. For example, I would be working with Christian artists, so a potential advertiser might be a Christian colleges that offer music degrees or a retail music gear suppliers. Lastly, 5) What would be a reasonable number of artists’ songs on a website to be of interest to advertisers. Respectfully, I realize some of my questions are based on many variables, so I understand any responses based on my income goal are not binding. I would merely like to gain an idea if a small $500+ supplemental income is a reasonable goal. By the way, I should also mention I would likely charge clients a listing fee, probably about $20 annually (but no per sales fee). I may offer the option their songs offered to listeners free of charge. Therefore, with the annual listing fee of clients (but no percentage of sales fee) and a few advertisers, am I realistic in my goal of income–nonbinding of your response, of course. Any other insight on how distributors earn income is appreciated. Thank you very much as I am entirely new to this endeavor–Jeff Fletcher.
[…] + How to Make a Website: The Ultimate Guide for Bands & Musicians […]
Does YOUR BANK ACCOUNT have a balance of $0.00?
Because truth is, most people are not
and if thats you, then YOU need my help
New Software Activates UNLIMITED Income Streams
in Just 28 Seconds & Generates Me 5 Figures a Month..
Activate YOUR License Today for Only $1.00 (PROOF
& DEMO BELOW)
Yes! I Want Instant Access To Create
UNLIMITED INCOME STREAMS NOW!
Do that now and watch the whole video.
Suggested Price was $197/month
Today Only $1.00
Click Here to Get in for ONLY $1.00
Oh my my my…